My Simple Flutter App: Part 3 — Adding a form
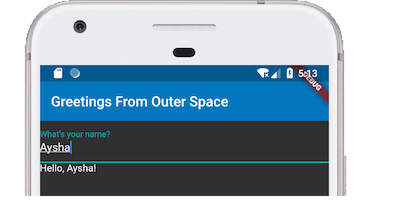
In Part 2, we fixed the UI. For Part 3, we will be updating our app to display a greeting which includes a name that’s entered into a text box. The end result will look something like the image below. We will iterate over the UI/X and functionality throughout this series.

We’ll be using a few widgets to display a:
- Textbox — To enter the name to whom the greeting will address
- Text — To display the greeting
Update the App Bar Title
Let’s update our app bar to match the function of our app. It will now say “Greetings From Outer Space”.
To start, let’s update the test first, then change the implementation.
Update your test in widget_test.dart to look for the text Greetings From Outer Space.
testWidgets('The App bar displays the app name', (WidgetTester tester) async {
  await tester.pumpWidget(MyApp());
  expect(find.text('Greetings From Outer Space'), findsOneWidget);
});
Tests should be red.
Now, update main.dart to display the new app bar title.
import 'package:flutter/material.dart';

void main() => runApp(MyApp());

class MyApp extends StatelessWidget {
  @override
  Widget build(BuildContext context) {
    return new MaterialApp(
      theme: ThemeData(
          brightness: Brightness.dark,
          primaryColor: Colors.lightBlue[800],
          accentColor: Colors.cyan[600]
      ),
      home: Scaffold(
        appBar: AppBar(
          title: Text('Greetings From Outer Space'),
        ),
        body: Center(
          child: Text('Hello World'),
        ),
        bottomNavigationBar: BottomAppBar(
          child: Container(height: 50.0,),
        ),
      ),
    );
  }
}
Re-run your tests. They should be green!
Display, “What’s your name?”
Let’s update our tests to look for the text “What’s your name?”.
Since we no longer need to look for “Hello World,” let’s update that test to look for our question.
testWidgets('Display What\'s your name', (WidgetTester tester) async {
  await tester.pumpWidget(MyApp());
  expect(find.text('What\'s your name?'), findsOneWidget);
});
Tests are red.
—
Now lets update the `Text` widget with the question.
import 'package:flutter/material.dart';

void main() => runApp(MyApp());

class MyApp extends StatelessWidget {
  @override
  Widget build(BuildContext context) {
    return new MaterialApp(
      theme: ThemeData(
          brightness: Brightness.dark,
          primaryColor: Colors.lightBlue[800],
          accentColor: Colors.cyan[600]
      ),
      home: Scaffold(
        appBar: AppBar(
          title: Text('Greetings From Outer Space'),
        ),
        body: Center(
          child: Text('What\'s your name?'),
        ),
        bottomNavigationBar: BottomAppBar(
          child: Container(height: 50.0,),
        ),
      ),
    );
  }
}
Run the tests. They should be green!
Add the TextFormField
If you thought about writing a test, you’re headed in the right direction. We need a new test for our `TextFormField`. Since the field is not there yet, the test should fail.
testWidgets('A text box is available', (WidgetTester tester) async {
  await tester.pumpWidget(MyApp());
  expect(find.byType(TextFormField), findsOneWidget);
});- I searched and searched for good testing examples, and I couldn’t quite find what I was looking for, and then I found Abraham Williams’ post on testing flutter forms.
Now let’s update the body of our Scaffold to include a `TextFormField` widget and to also include our question, “What’s your name?”.
To display “What’s your name?,” we no longer need the Text widget we were using previously, instead we will use the TextFormField widget to display both the question text as well as the field in which to enter a name.
To get a field to enter a name, we simply place a TextFormField widget within the body of our scaffold widget.
To display the question text, we will use the decoration property of the TextFormField and set it to an InputDecoration widget. The InputDecoration widget has a property called labelText that we will use to display the question text.
import 'package:flutter/material.dart';

void main() => runApp(MyApp());

class MyApp extends StatelessWidget {
  @override
  Widget build(BuildContext context) {
    return new MaterialApp(
      theme: ThemeData(
          brightness: Brightness.dark,
          primaryColor: Colors.lightBlue[800],
          accentColor: Colors.cyan[600]
      ),
      home: Scaffold(
        appBar: AppBar(
          title: Text('Greetings From Outer Space'),
        ),
        body: Center(
          child: TextFormField(
            decoration: const InputDecoration(
              labelText: 'What\'s your name?',
            )
          )
        ),
        bottomNavigationBar: BottomAppBar(
          child: Container(height: 50.0,),
        ),
      ),
    );
  }
}
Re-run your tests. They should be green!
Note: If you run your app, you’ll notice the UI isn’t the best, but fear not! We’ll fix it.
Add placeholder text
In our mockup we have a question asking users for their name. Let’s update our existing test for the TextFormField to look for its place holder.
testWidgets('A text field is available with placeholder text', (WidgetTester tester) async {
  await tester.pumpWidget(MyApp());
  expect(find.widgetWithText(TextFormField, 'Your Name'), findsOneWidget);
});
Run your tests. They should fail.
—
To add placeholder text, we will add the hintText property to our InputDecoration widget. Then, we will pass hintText our placeholder, “Your Name”.
import 'package:flutter/material.dart';

void main() => runApp(MyApp());

class MyApp extends StatelessWidget {
  @override
  Widget build(BuildContext context) {
    return new MaterialApp(
      theme: ThemeData(
          brightness: Brightness.dark,
          primaryColor: Colors.lightBlue[800],
          accentColor: Colors.cyan[600]
      ),
      home: Scaffold(
        appBar: AppBar(
          title: Text('Greetings From Outer Space'),
        ),
        body: Center(
          child: TextFormField(
            decoration: const InputDecoration(
              hintText: 'What\'s your name?',
              labelText: 'Your Name'
            )
          )
        ),
        bottomNavigationBar: BottomAppBar(
          child: Container(height: 50.0,),
        ),
      ),
    );
  }
}
Run the tests. They all pass!
Capture Text and Display It
Now, let’s add the greeting “Hello, Aysha!”, which appears below the text field.
—
Write a test! We want the greeting to be displayed after the name has been entered. Let’s simulate that in the test.
testWidgets('A greeting is displayed', (WidgetTester tester) async {
  await tester.pumpWidget(MyApp());
  final Finder textfield = find.widgetWithText(TextFormField, 'Your Name');

  await tester.enterText(textfield, 'Aysha');
  await tester.pump();

  expect(find.text('Hello, Aysha!'), findsOneWidget);
});
The test fails. Perfect!
Create a custom form widget
We’re going to create a new class that represents a form and listens for changes on the `TextFormField`.
Create a `GreetingForm` class and a `_GreetingFormState` class. The GreetingForm class will represent our custom form widget and `_GreetingFormState` will keep track of the state for that widget.
import 'package:flutter/material.dart';
import 'package:flutter/widgets.dart';

class GreetingForm extends StatefulWidget {
  @override
  _GreetingFormState createState() => _GreetingFormState();
}

class _GreetingFormState extends State<GreetingForm> {

  void dispose() {
    super.dispose();
  }

  @override
  Widget build(BuildContext context) {

  }
}
We need to move our `TextFormField` widget, into _GreetingFormState, so that we can assign it a controller from the class.
import 'package:flutter/material.dart';
import 'package:flutter/widgets.dart';

class GreetingForm extends StatefulWidget {
  @override
  _GreetingFormState createState() => _GreetingFormState();
}

class _GreetingFormState extends State<GreetingForm> {

  @override
  void dispose() {
    super.dispose();
  }

  @override
  Widget build(BuildContext context) {
    return TextFormField(
      decoration: const InputDecoration(
          labelText: 'What\'s your name?',
          hintText: 'Your Name'
      ),
    );
  }
}
In main.dart, make sure to replace your `TextFormField` widget with your new `GreetingForm` widget.
import 'package:flutter/material.dart';

import 'GreetingForm.dart';

void main() => runApp(MyApp());

class MyApp extends StatelessWidget {
  @override
  Widget build(BuildContext context) {
    return new MaterialApp(
      theme: ThemeData(
          brightness: Brightness.dark,
          primaryColor: Colors.lightBlue[800],
          accentColor: Colors.cyan[600]
      ),
      home: Scaffold(
        appBar: AppBar(
          title: Text('Greetings From Outer Space'),
        ),
        body: Center(
          child: GreetingForm()
        ),
        bottomNavigationBar: BottomAppBar(
          child: Container(height: 50.0,),
        ),
      ),
    );
  }
}
Run your tests! This is to ensure that we haven’t broken any existing functionality. We’ll continue to run these tests after each change.
Only one test should be failing, which is the one that was added most recently.

Add a controller to the TextFormField
Since we’re using a TextFormField we’ll need to use a TextEditingController to capture the text entered for the name.
We will also need to call dispose on the controller to ensure that it’s cleaned up when our custom form widget (`GreetingForm`) is destroyed. Learn more about `dispose()`.
import 'package:flutter/material.dart';
import 'package:flutter/widgets.dart';

class GreetingForm extends StatefulWidget {
  @override
  _GreetingFormState createState() => _GreetingFormState();
}

class _GreetingFormState extends State<GreetingForm> {
  final textEditingController = TextEditingController();

  @override
  void dispose() {
    textEditingController.dispose();
    super.dispose();
  }

  @override
  Widget build(BuildContext context) {
    return TextFormField(
      decoration: const InputDecoration(
          labelText: 'What\'s your name?',
          hintText: 'Your Name'
      ),
      controller: textEditingController,
    );
  }
}
Run your tests. The same tests should be passing and failing.
Add a listener to the controller
To capture the value entered into the text field, we’ll need to add a listener to the textEditingController. And, we’ll need to create a method (`_captureText()`) to pass to that listener. We will also need a global variable (`_greetingText`) to store the greeting we want to display in the UI.
import 'package:flutter/material.dart';
import 'package:flutter/widgets.dart';

class GreetingForm extends StatefulWidget {
  @override
  _GreetingFormState createState() => _GreetingFormState();
}

class _GreetingFormState extends State<GreetingForm> {
  final textEditingController = TextEditingController();
  var _greetingText = '';

  @override
  void initState() {
    super.initState();
    textEditingController.addListener(_captureText);
  }

  @override
  void dispose() {
    textEditingController.dispose();
    super.dispose();
  }

  void _captureText() {

  }

  @override
  Widget build(BuildContext context) {
    return TextFormField(
      decoration: const InputDecoration(
          labelText: 'What\'s your name?',
          hintText: 'Your Name'
      ),
      controller: textEditingController,
    );
  }
}
Run your tests. You know the drill.
Call setState()
The addListener() method is called every time the text form field changes, but it won’t update the UI. We’ll need to update the _captureText() method to call setState() if we want the UI to re-render with the changes from the text form field. Right now, we’re going to call `setState()` and pass it an empty clojure. We’ll update this later.
void _captureText() {
   setState(() {
   });
}
Run tests. They should still fail.
Add a Text widget to display the greeting
When a name is entered into the TextFormField widget, we want to display a greeting with the name that was entered into the text form field. To do so, we need to add a Text widget to our form.
With the addition of the Text widget, we have two widgets that need to be displayed, theText widget and the TextFormField widget. So, let’s add a Column widget to display both of them.
Update the build method in the `_GreetingFormState` class to match the following:
  @override
  Widget build(BuildContext context) {
      return Column(
        crossAxisAlignment: CrossAxisAlignment.start,
        children: <Widget>[
          TextFormField(
            decoration: const InputDecoration(
                labelText: 'What\'s your name?',
                hintText: 'Your Name'
            ),
            controller: textEditingController,
          ),
          Text("")
    ]);
  }
Run your tests. Tests fail as expected.
Grab the text from the controller.
The text that is entered into the text form field is recorded by the textEditingController. To get the value that’s entered into the text form field, we need to access the text property of the controller, like so: textEditingController.text. We will access this property inside of the _captureText() method and we will update the global variable, _greetingText, with that value.
void _captureText() {
   setState(() {
     _greetingText = "Hello, ${textEditingController.text}!";
   });
}
Run the tests. They should fail.
Display the text to the screen
Our final steps are to update the Text widget with the global variable _greetingText.
@override
Widget build(BuildContext context) {
  return Column(
      crossAxisAlignment: CrossAxisAlignment.start,
      children: <Widget>[
        TextFormField(
          decoration: const InputDecoration(
              labelText: 'What\'s your name?',
              hintText: 'Your Name'
          ),
          controller: textEditingController,
        ),
        Text(_greetingText)
      ]);
}
Remember that the the _captureText method updates _greetingText with the value entered into the text form field. The _captureText() method is called whenever the listener for the textEditingController is triggered. So, _greetingText will always be up-to-date with the value entered into the TextFormField.
Run the tests. They should pass!
Build your App
Rebuild your app and use it.
You’ll notice that it isn’t quite styled like the mock-up, and that it displays “Hello, !” as soon as you tap into the text form field. We’ll fix these things in part 4.